What is OnePgr?
OnePgr is a collaboration product that allows people to work together on common projects regardless of their location. Be it your customers, peers, friends or any other associates, you can use this tool to discuss your ideas, share documents, or exchange messages. OnePgr is easy to use and offers multiple ways to communicate and collaborate.
OnePgr is available as a web application for the users in basic, pro and enterprise versions. There are also various business applications available for your Android or iOS devices.
Contact us for more details.
Features of Onepgr
OnePgr offers all the features of a unified communication and collaboration center through its easy to use pages. Main features include:
-
Secure and controlled sharing of resources.
-
High quality Audio and Video support.
-
Targeted Messaging as well as broadcast features.
-
Real time co-create functionality on pages.
-
Screen sharing and recording features
-
Easy and Seamless integration with other organizational tools like SalesForce.
-
Central cloud based repository to save engagement pages and interaction data.
-
Easy access through web and mobile apps.
How do I create a Onepgr account?
Creating a new OnePgr account is a very simple process. Click the signup button on the home page of onepgr.com.
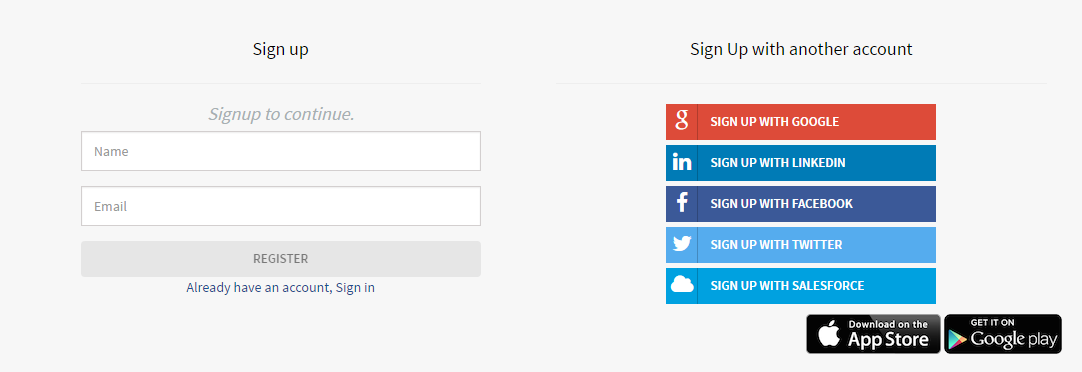
You can create a new user account here or use any other social login to use your existing accounts of Google, Facebook, LinkedIn, Twitter or SalesForce.com on our site.
If you are registering a new account, provide your name and email address and click ‘Register’. A password will be sent to the registered email id which can be used for logging-in to onepgr.com.
To upgrade your account at any point of time, please contact us.
What is a Page?
A ‘Page’ is a logical entity which forms the basis of all collaboration through OnePgr. Any communication through OnePgr is done using a Page. For example, you can use it to start your marketing campaign and then invite attendees or you can use it to document the agenda for your upcoming meeting and share it across. A page allows you to easily manage all aspects of your collaboration.
The advantage of creating a ‘Page’ is that any notes/documents/comments/recordings once associated to a page are stored along with it and are thus easily available for future reference.
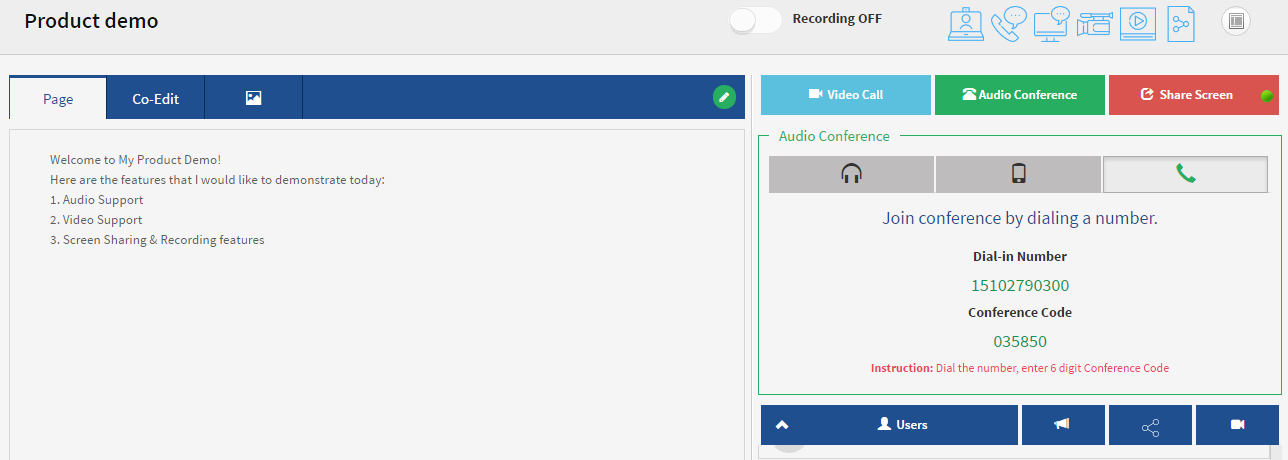
A sample 'Page' inviting a prospective client for a meeting is shown below:

How do I collaborate using Onepgr?
Collaboration using OnePgr is as simple as Create, Communicate and Collaborate. The basic foundation of OnePgr is a ‘Page’. A ‘Page’ is an entity on which all the collaboration tasks are performed and forms the basis of all the interactions.
Create: Create pages and associate documents to them. All these documents are securely stored on a central hub.
Communicate: Exchange messages, save notes with respect to pages/objects under discussion. Use audio/video/screen sharing tools to communicate effectively in real time.
Collaborate: Invite teams to view/discuss pages through email or sms. Use screen sharing/co-create features to collaborate effectively from anywhere.
How do I create a new Page?
To create a new page,
- Login to the OnePgr app with your account.
- Go to the ‘Home’ page or ‘My Pages’.
- Click the ‘New Page’ button at the top.
- This will open a new page wizard as shown below.
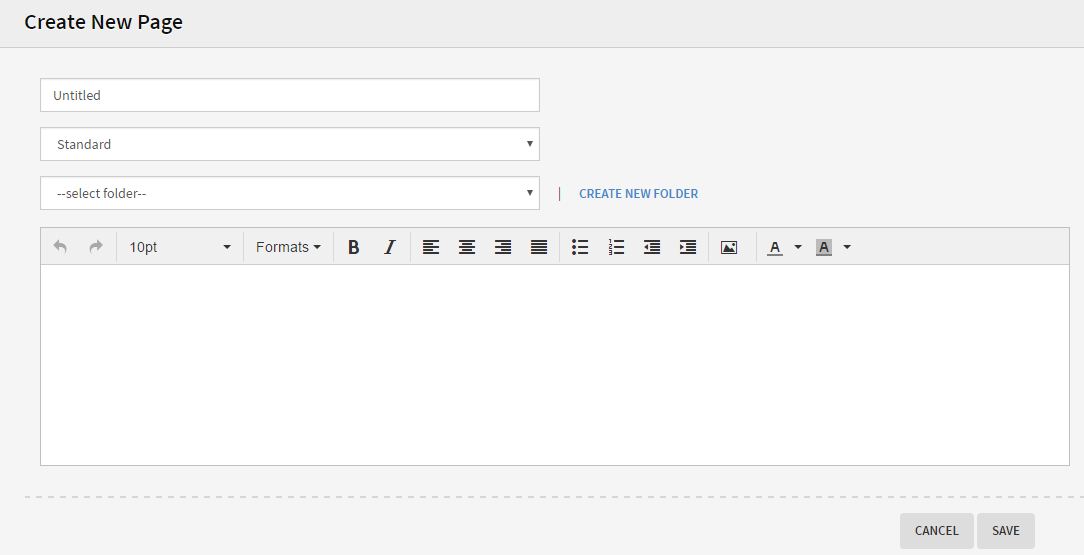
- Select a name for the page.
- Select the type of page from the next drop down menu. You can choose between a standard/normal page, a blog or a lead/landing type of page.
- Choose the folder where the page should be saved from the next drop down menu. If you want to create a new folder for the page, Click ‘CREATE NEW FOLDER’ on the right.
- Add contents to the page and click ‘SAVE’. This saves the page on our cloud for all future references.
- To refer to the page again, find it under ‘My Pages’ section on the app.
How do I share this page with others?
A Page forms the basis of communication with OnePgr. So the first step of collaboration usually starts with sharing of page with others. You can share a page to specific people through email or sms or through your social account on Facebook.
To share any page,
- Open the page to be shared.
- Click the share icon
 on the right of the page
- The following screen shows up.
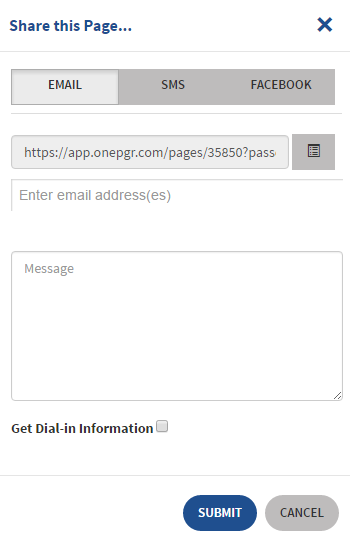
- Choose the invite method(email/sms/facebook) and enter details like email addresses or phone numbers and the message to be sent along with the invite.
- Click ‘Submit’ to send your invite to access the page.
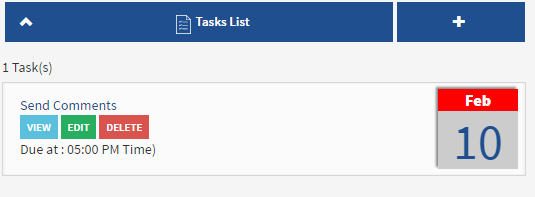
How do I add tasks or events to a page?
Tasks
Tasks can be any activities associated with a page. You can add tasks to subdivide a given job or track the status of a pending job. For example if a page is used to review some document, tasks can be created to get review comments on it and then to make changes based on the review comments. Tasks can be tracked with time.
- Click on the ‘+’ icon next to the ‘Task List’ on the page. A new task form will appear.
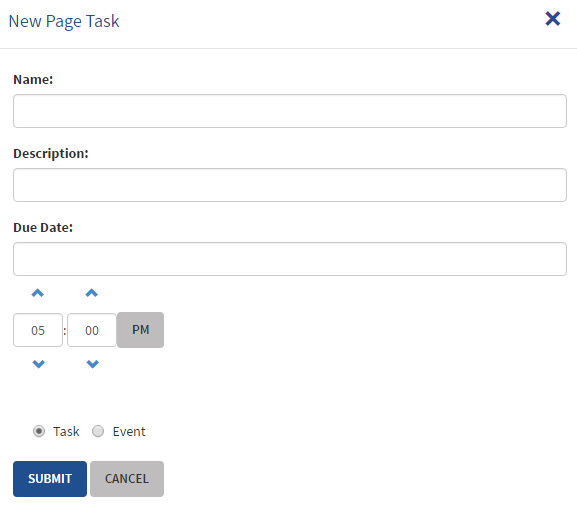
- Enter the task details and click ‘Submit’.
- The task created will be listed under the task list of the page as shown below.
Events
Events are tasks which are time bound. For example, a meeting or conference scheduled at a particular day and time can be called an event.
Creating an event is similar to creating a task. Follow the steps listed above and select the event radio button at the bottom of the page while creating an event.
Note: OnePgr app supports notifications to be generated for events. By default, notifications are not generated. But this feature can be enabled for custom installations of the app. Contact us for more details.
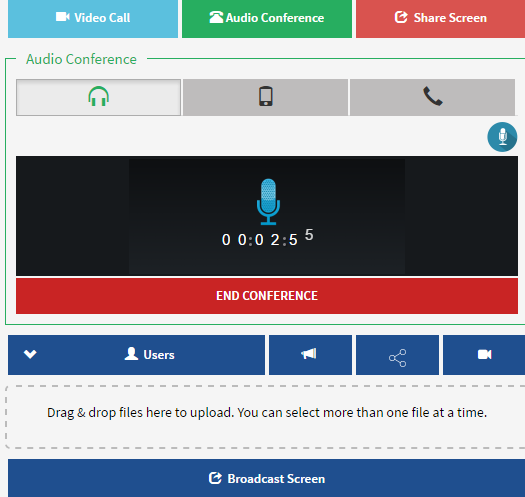
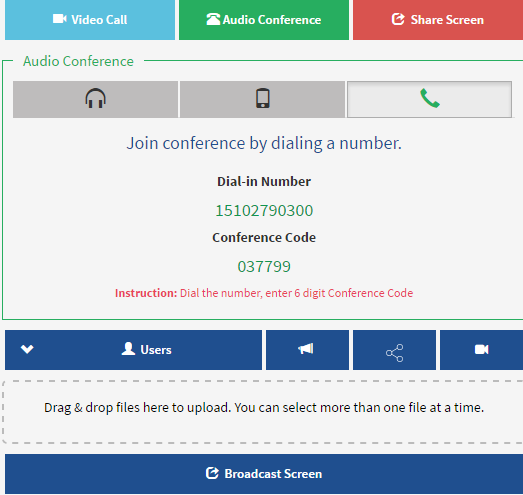
How do I set up an Audio Conference?
Setting up Audio Conference with OnePgr app is very simple. You can set up audio conference from a browser window. It is supported on both chrome and firefox browsers. All it needs is a OnePgr plugin for the browser when used for the first time.
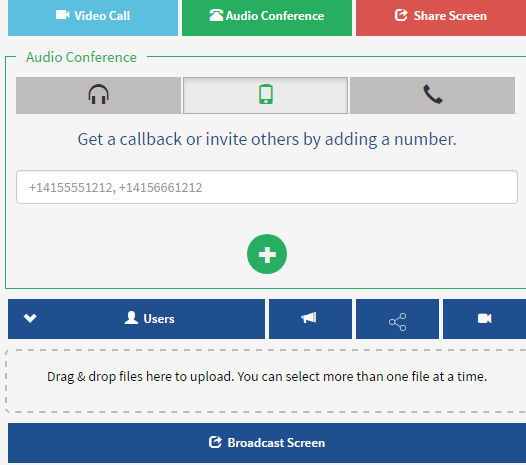
OnePgr app gives you three ways to set up audio conference.
- You can start a VOIP call with the members of the page.
- You can request for a callback on your phone.
- You can see the number to dial into the conference.
To start an audio conference:
- Click the audio conference icon on the top or the button on the right side of the page.
- Choose one of the ways listed above to join the conference.
- When initiating a VOIP conference call, other members of the page will be notified and prompted to join the call.
- In case a callback is requested, add all the numbers in the textbox and click the dial icon.
- The third option lists the conference call numbers and pass code to dial in to join the call.
Note: Audio conference works best with the newer versions of chrome and firefox. VOIP calls use the microphone of the device to transmit your audio. Hence, the app would require permissions to use the hardware.
How do I set up a Video call ?
Video call uses the microphone and camera of the device to transmit your audio and video. The app would seek permissions to use the hardware of the device.
To set up a video call between the members of the page:
- Click the Video call button on the right or the video call icon on the top right of the page.
- This would open a screen which shows the camera view of your device.
- Click the Start Video Call button to start sharing your video with others.
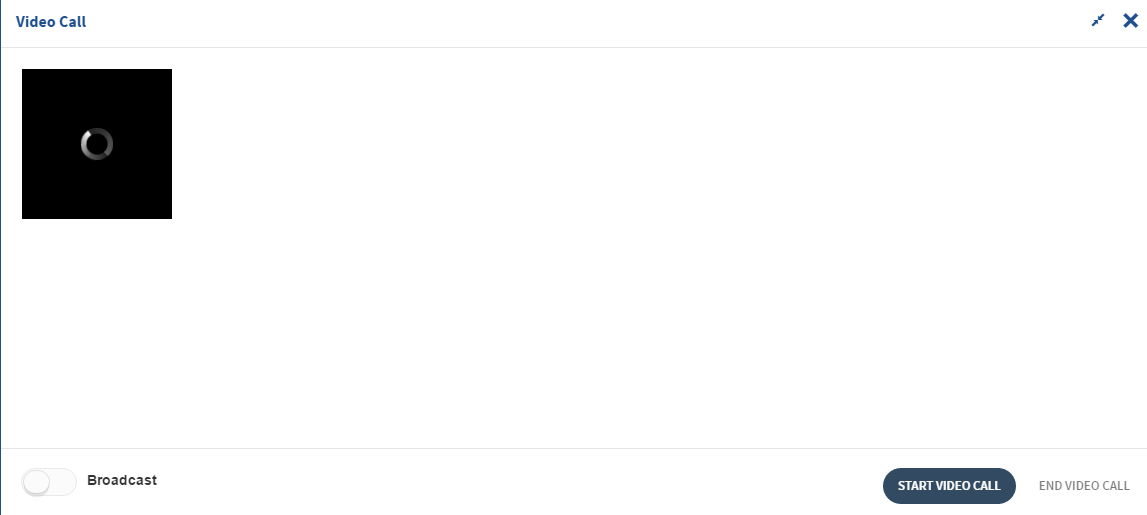
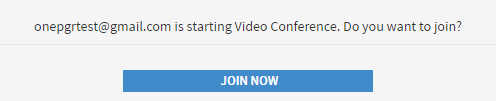
- Whenever a video call is initiated, all the other members are prompted to join the call.
- Whenever any members wishes to join the call, video transmission will happen.
- Similarly, members can choose to leave the call by clicking the button 'Leave video call'.
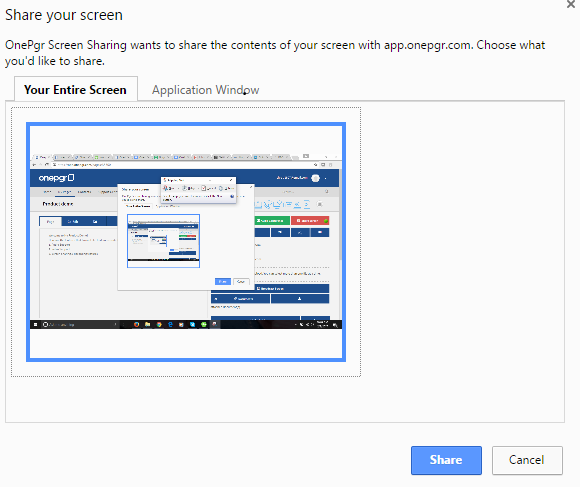
How do I share my screen with others?
How do I record my screen activities to be played back later on?
Similar to screen sharing, you can also choose to only record your screen activities. This can be easily done with a OnePgr app. This also requires custom onepgr plugin to be installed for your browser.
- Click on the 'Record screen' button on the top right of the page.
- Install the onepgr plugin for your browser, when using the feature for the first time.
- The following screen will allow you to choose the screen to be shared, either the whole of your screen or a particular application window.
- Choose the screen you want to record and click the ‘Record’ button.
- Once successfully initiated, it will show the status at the bottom of the window.
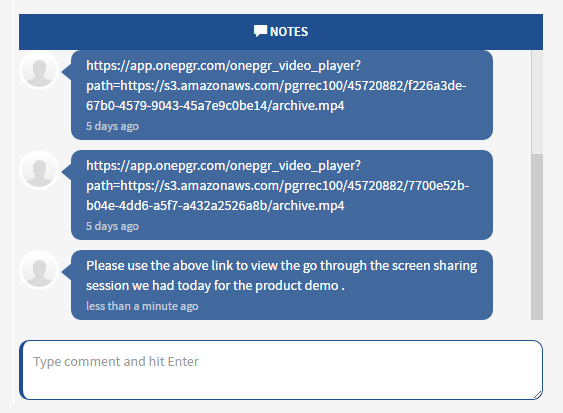
- Any screen sharing recording is saved instantly on the cloud and its link is available to the members of the page as a new note in the Notes section. This gives an advantage to everyone to be able to view it again anytime, if needed.
How do I record a video to be added to my page?
Recording a video and attaching to a page is a very useful feature of OnePgr app, particularly when you are giving a live demo or presentation. Once recorded, if anyone has missed the meeting, can go to the page and see it at his or her convenience.
To record a video:
- Click the record video icon on the top of the page.
- This starts the camera and microphone of the device and shows you various recording options.
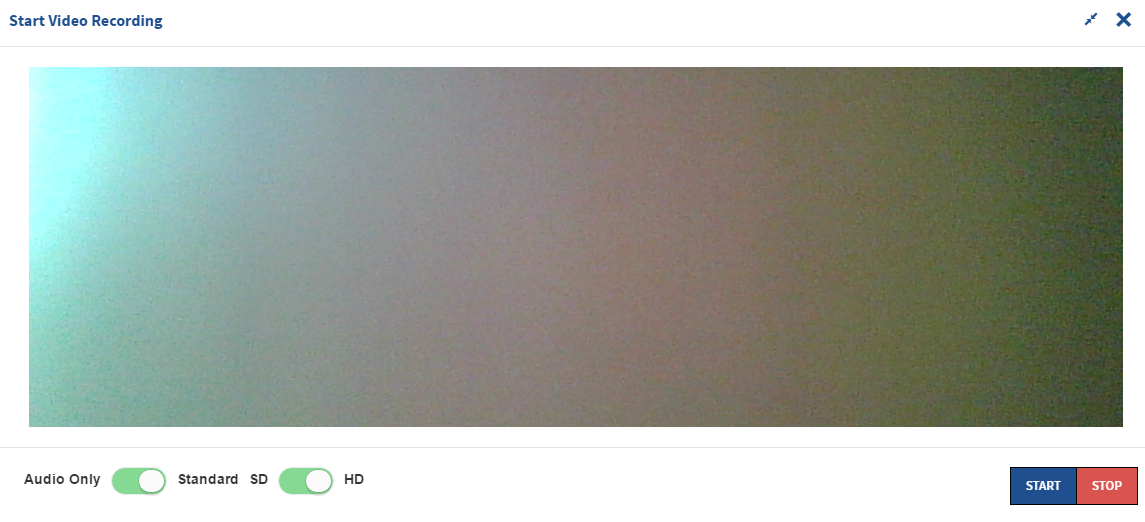
- There are options to choose audio/video or audio only recording.
- Video recording gives you options to create a SD or HD quality video.
- Choose the settings and click start button to start recording.
- After the recording is done, click the Stop button.
- This saves the recording on the cloud.
- You can now replay the recording, copy its URL, delete it or even upload it on youtube.
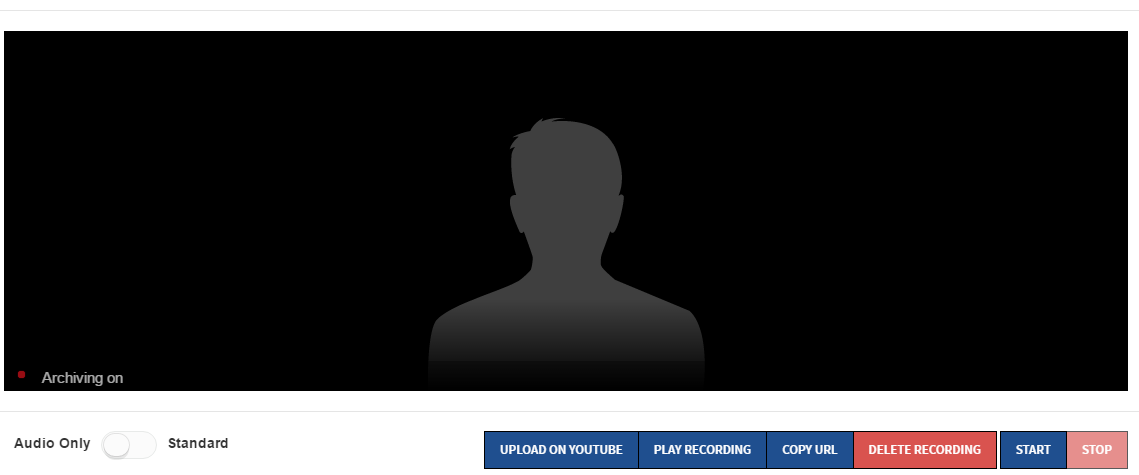
- If not deleted, once this window is closed, a link to the recording is copied to the Notes section for reference by other members of the page.
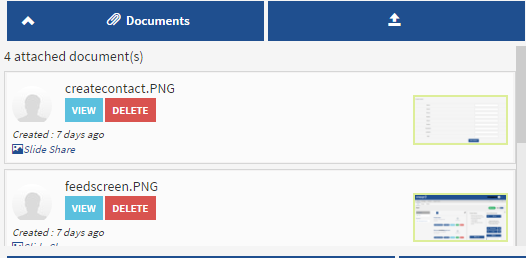
How do I attach a document to a page?
Sometimes there are documents which need to be shared and referenced by everyone associated to the page. This can be easily achieved by attaching a document to a page which is then available to everyone in the page.
To attach a document:
- Click the attach document icon next to the document list of the page.
- Choose the document to be attached.
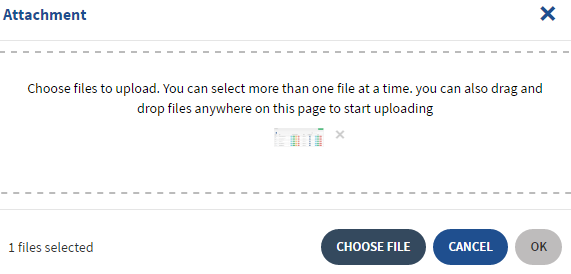
- Click Ok. The attached page is shown under the document list.
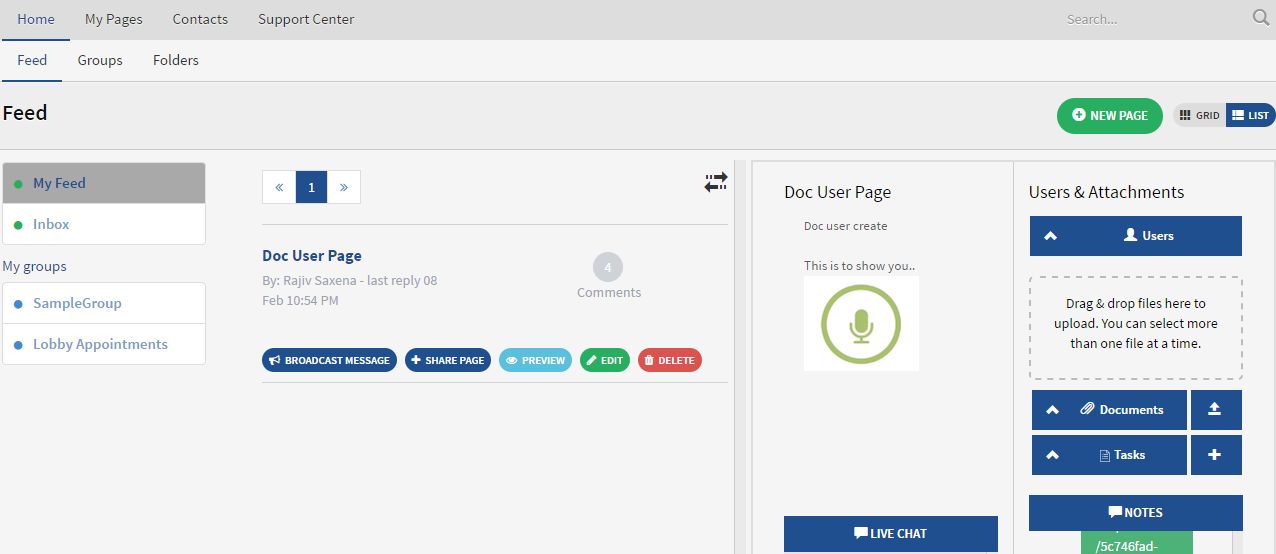
What is a feed?
Feed serves a way to get latest updates quickly. It offers you a single place where you can see your pages, read or comment on them. Feed shows the list of pages in the order of their creation or updation times. They are pages which you have created or which have been shared with you. Every entry on feed has a little brief about the page, number of comments and buttons to edit, delete, preview or share the page. Feed also shows a preview of the latest page on the right side of the page.
This is how a feed looks :
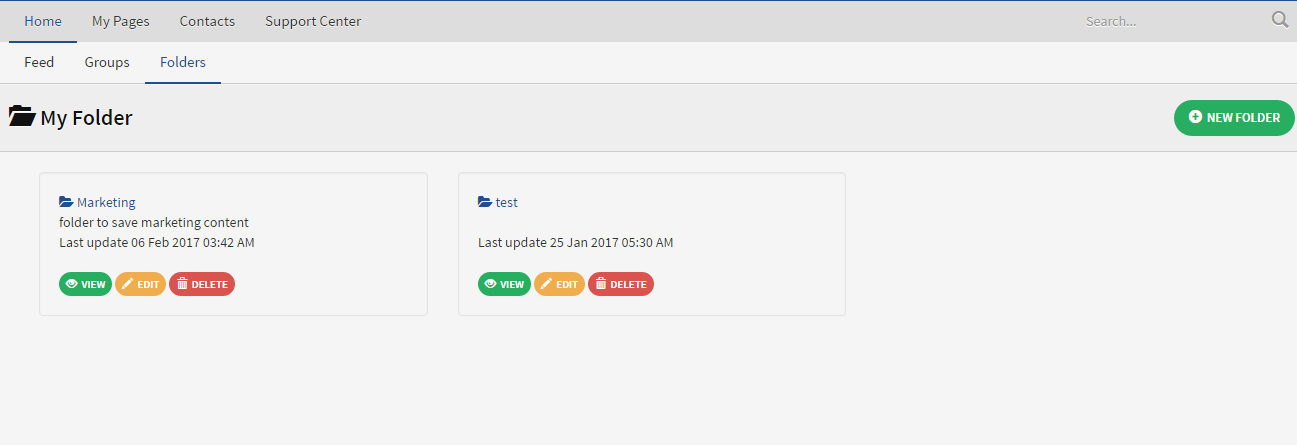
What are folders and how do I create a new folder?
A folder is a virtual way of storing and organizing your pages on the cloud. They help you manage pages easily by separating them logically. My folders tab under the ‘Home’ section shows you all the folders that you have created.
- Click the ‘New Folder’ button on the top right.
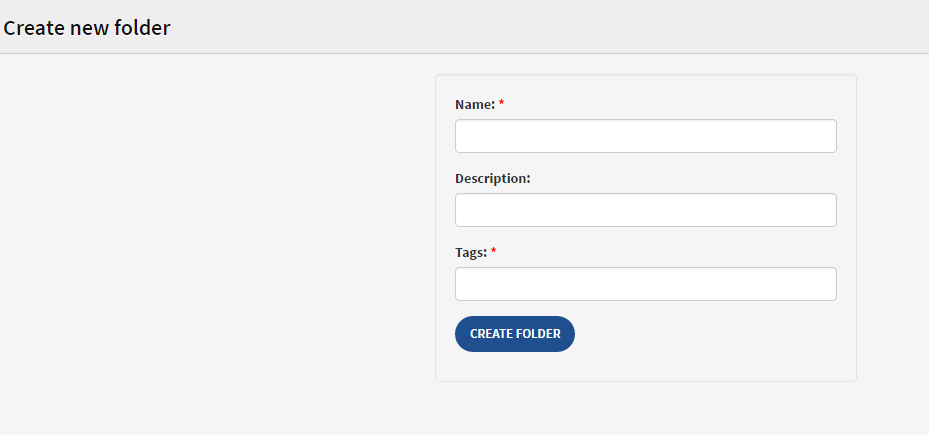
- Enter details for the new folder. Give it an appropriate name, add a description and add some tags associated with the folder.
- Click ‘Create folder’ and your folder is created.
How do I manage contacts on OnePgr?
Contacts can be easily managed through OnePgr app. All the existing contacts are listed under ‘Contacts’ section.
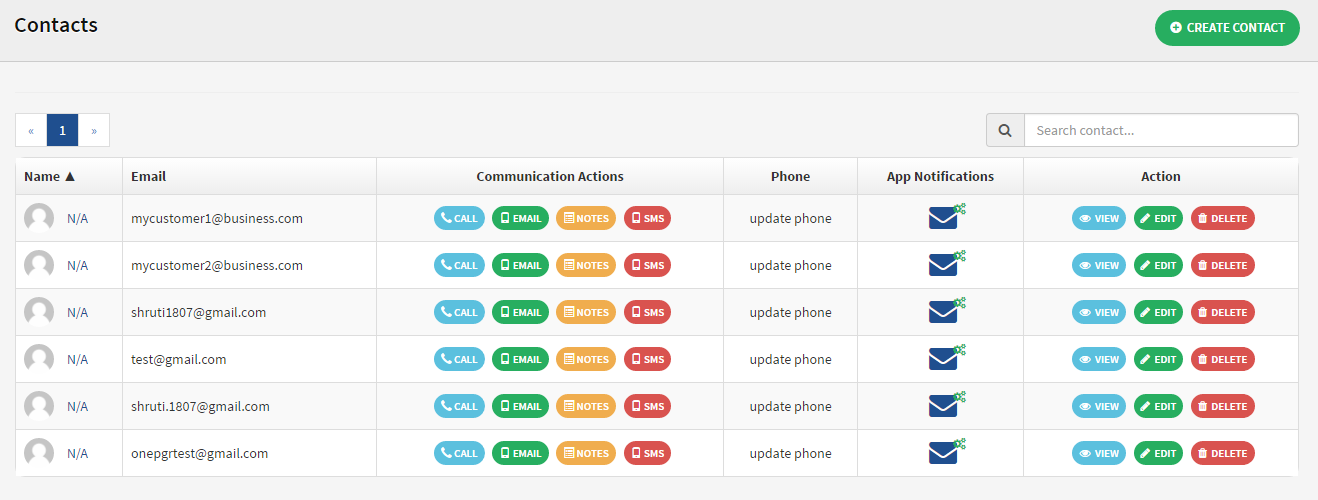
This page also allows you to take various actions on the contacts like call, email or sms them. Call option allows you to set up either a VOIP call or a phone call with the contact. Email or sms options use the saved email id and contact number of the contact. You can also write notes associated with the contact.
Add a new contact:
There are two ways a new contact is added to OnePgr app. Whenever a page is shared with a new contact, a new entry is automatically added and the contact is saved for future reference. You can also explicitly add a new contact. For that,
- Click on ‘Create Contact’ button in the contacts page.
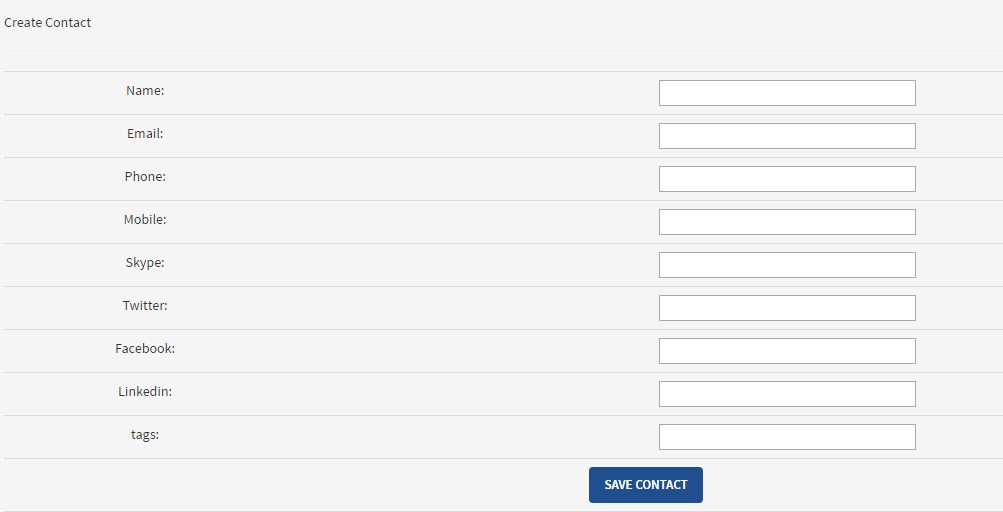
- Enter the details of the contact on the above shown page.
- And click ‘Save Contact’.
What are groups and how do I set up a new group?
Groups are a logical way to divide pages. For example, when specific kind of pages are always to be shared within a certain audience, it can be assigned to a particular group. Groups help automatic categorization of pages making it easier to go through them . Once a page is assigned to a group, it is automatically shared with the members of the group. This makes the process of working on them faster.
To create a new group:
- Click on the ‘Groups’ subtab on the home page of the app.
- Click ‘New Group’ button on the right of the page.
- Enter the details of the group on the following page.
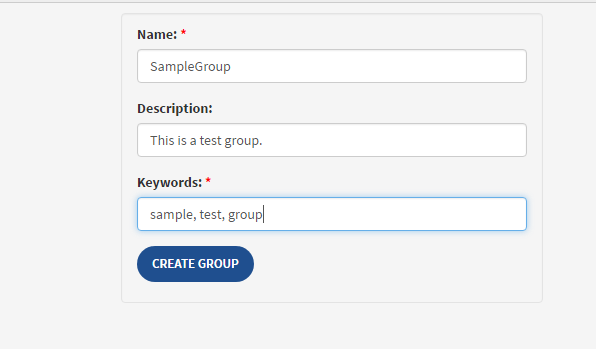
- Click ‘Create Group’ button.
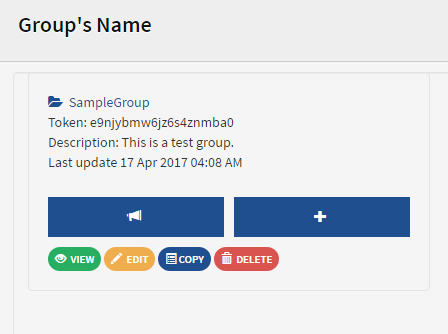
- Once a group is created, its details can be seen under the groups tab.
How do I create and use a spreadsheet?
A single worksheet with basic important features of a spreadsheet are available with the OnePgr app. This comes in handy when you need to store and retrieve your data in a grid format of rows and columns. This is particularly useful for numerical data when some calculations and analysis is required on that data.
This feature of OnePgr supports the basic operations of excel like storage of data in rows and columns, conditional formatting, performing simple arithemetic operations on data in the cells. Excel formulas can be used as it is in this app. Some examples are listed below:
- To add numbers in the given cells =SUM(A1:B5)
- To count the cells in a range =COUNT(A1:A10)
- To add a if condition =IF("C3>D3", "target achieved" , "target lost")
To open the spreadsheet, click on the page to which it is to be associated and then click on the spreadsheet tab as shown below.
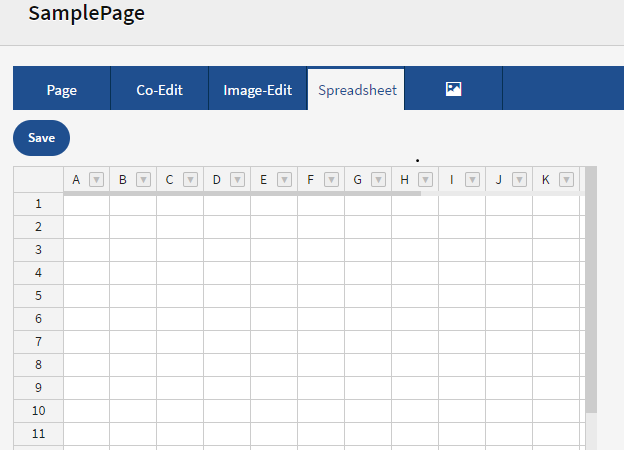
This tab provides a worksheet of 16*15 cells which can increase as per the requirement. Enter your data as required and click Save button on the top. This will save the sheet on the cloud along with the page.
For any other queries or specific customizations, please contact us on www.onepgr.com. We will be happy to help!